30-day return policy
800.000 active customers

Ordering Your New Bike Online: Quick Delivery and Easy Assembly

Bike assembling and shipping

Need Some Help? This Is How the Final Assembly at Home Becomes a Breeze!

You want to buy a bike online at BIKE24 and are wondering what to do after delivery in terms of bike assembly at home? Our well-structured assembly instructions provide the answer and allow even beginners to get their new bike assembled from the box in just 3 steps. The secret is the comprehensive pre-assembly by our expert mechanics. Furthermore, we test all functionalities before shipping so that you can start pedaling right after the assembly at home. The box with your dream bike has arrived? Great, then let's start adjusting the bike right away.

Our Assembly Instructions in Just a Few Steps

We also want to get on our bikes as soon as possible – so here's a quick tip: You can see from the bike icons whether the step is relevant for your type of bike.

Bicycle assembly – your bicycle icon, your assembly step

1. Preparation

The Tools for Assembly/Adjustment – You Don't Need Much at All

Bike assembling – tools & equipment
  • A pedal wrench or 15 mm open-end wrench, a 4 mm, 5 mm, 6 mm, 8 mm Allen key, a T25 Torx and a pair of scissors or a side cutter respectively.
  • Recommendation: a torque tool with appropriate bits for maximum safety and protection of sensitive components.
  • Buy the right tools now in your favorite shop!

Opening and Unboxing – The Tension Rises

Bike assembling – opening the shipping box
  • First open the shipping box (beware of the packaging clips).
  • Next, please remove the accessory box, if included (contains e.g. pedals, manual or warranty card).
  • Then you can take out the padding material and fold down the pre-perforated side panel.

Lifting the Bike out – The Moment of Truth

Bike assembling – lifting the Bike out of the shipping box
  • Thanks to the fold-down side wall, you don't have to lift your bike very high.
  • If your bike is a bit heavier, such as an e-bike, ask a friend to help you lift it.

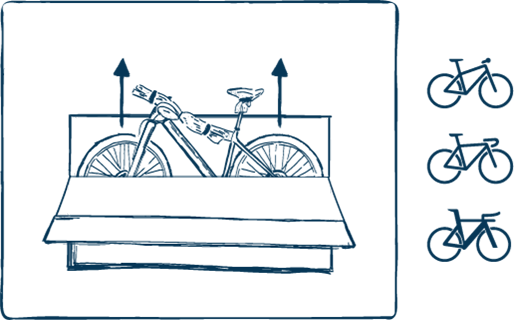
Removing the Bubble Wrap – Your Bike Strips Off
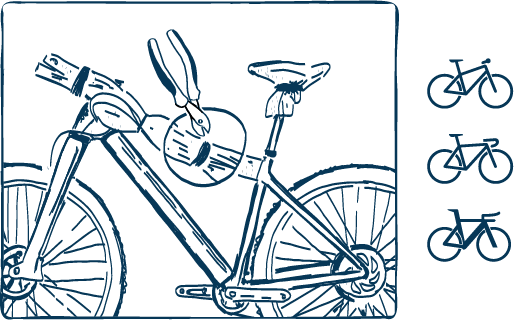
Bike assembling – wrapping of the foil
  • Now it's time to use your scissors or a side cutter.
  • Carefully cut the tapes or cable ties on the stem, saddle and frame.
  • Remove the protective foil.
  • Attention: the handlebars are also attached to the top tube, so be especially careful with the cables and hoses.

2. Assembly

Handlebar Mounting – How to Keep Everything under Control

Bike assembling – loosening of the stem bolts
  • First loosen the stem bolts with a 4 or 5 mm Allen key or Torx T25 key.

Bike assembling – placing of the handlebars & bolt on
  • Place the handlebars in the centre (oversized part) of the stem with its marks facing in the riding direction.
  • Next, put on the stem face plate and tighten it so that you can still easily turn the handlebars.
  • For carbon parts: check whether assembly paste has already been applied to the clamping surfaces or apply some if necessary.

Bike assembling – alignment of the handlebars
  • Check that the handlebars are centred.
  • Helpful scales are printed on most handlebars.
  • Otherwise, the oversized clamping area should stick out just as far on the left and right.

Bike assembling – final tightning
  • Start tightening the stem bolts with a 4 or 5 mm Allen key or Torx T25 key.
  • Tighten the (usually 4) bolts evenly in a cross pattern (bottom left & top right, bottom right & top left).
  • If you do not find a "No-Gap" label, make sure there is an even gap between the face plate and the stem body.

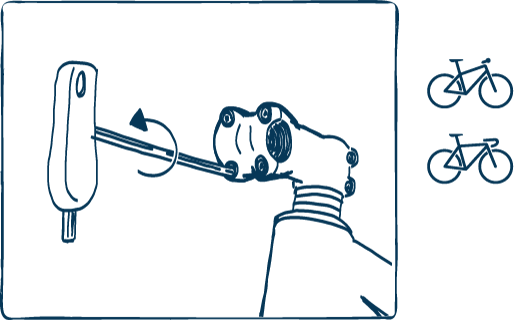
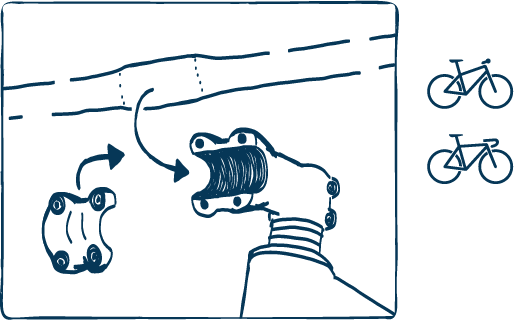
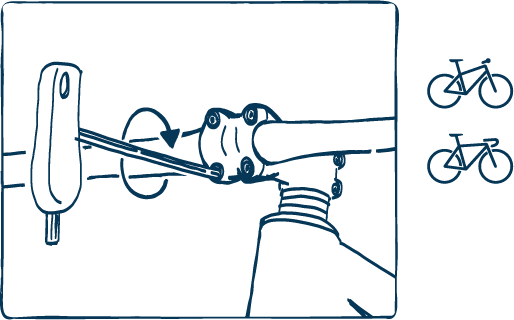
Mounting the Pedals – Very Simple, with the Right Turn

Bike assembling – screw in of the left pedal
  • Please note: If pedals are included depends on the model.
  • First screw the left pedal to the left crank arm.
  • The crank side and the matching pedal are both marked with a dot in the same color.

Bike assembling – screw in of the right pedal
  • Now screw the right pedal to the right crank arm.
  • The matching parts are also marked with a dot in same color.

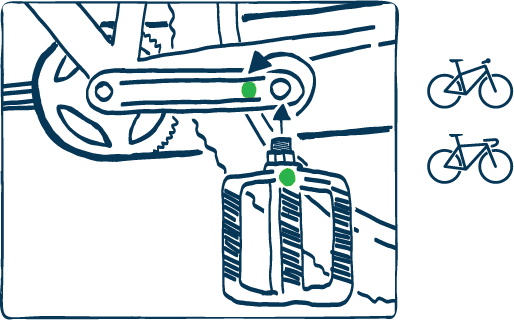
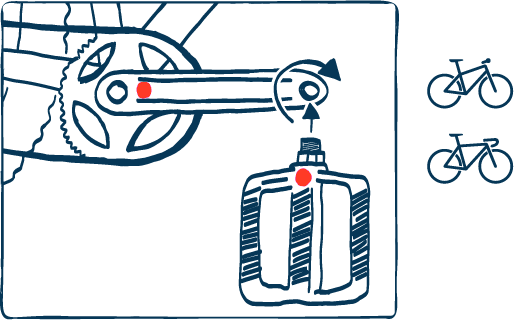
Tightening the Pedals – Two Quick Steps

Bike assembling – tightning of the pedals
  • Apply the 15 mm pedal wrench or, depending on the version, a 6 mm or 8 mm Allen key to the axles.
  • Tighten with the torque recommended by the manufacturer – usually 30 Nm – in the riding direction.

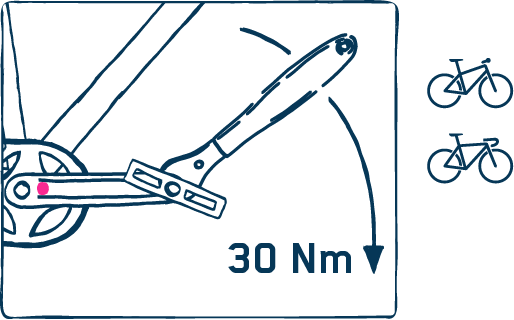
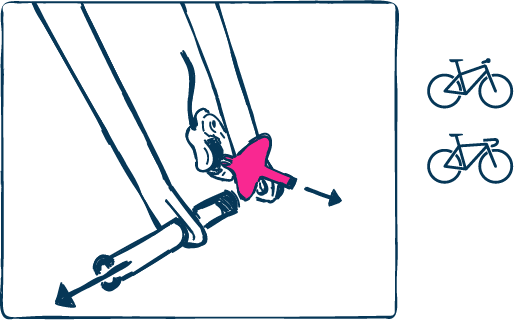
Installing the Saddle and Post – As Easy as Pie

Bike assembling – basic saddle alignment
  • Open the seat clamp with the quick-release lever or with a 4 mm or 5 mm Allen key or T25 Torx in an anti-clockwise direction.
  • Pull out the saddle to about hip height and tighten it again moderately.
  • As a starting point, we pre-assemble the saddle horizontally for you.
  • You can usually also adjust the saddle tilt and fore aft position using a 5 mm or 6 mm Allen key or T25 Torx on the underside.

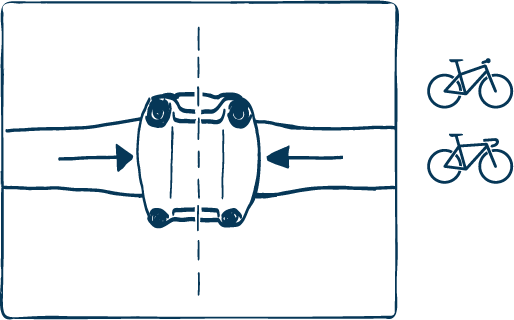
Mounting the Front Wheel – Rarely Necessary, Easily Done
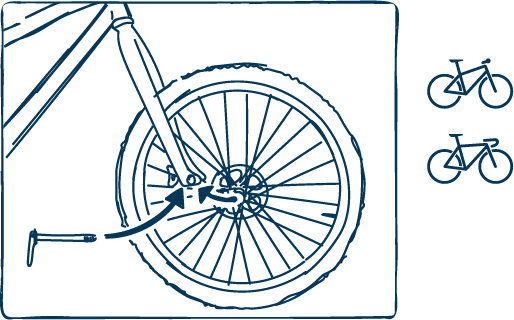
Bike assembling – preparing the front wheel mounting
  • First remove the through axle or quick release and the transport lock on the brake – please do not pull on the brake lever afterwards

Bike assembling – mountaing of the front wheel
  • Insert the front wheel via the so-called dropouts (openings) on the underside of your fork.
  • Next, fit the quick-release or thru axle through the dropouts and hub.
  • Tighten the axles with quick-release levers so that the lever, which is slightly under tension, can be closed completely to the fork leg with moderate force.
  • If your axle is 100% bolted, use the 6 mm Allen key and check with a torque tool.
  • If you have bought an Enduro or DH bike, it may also be necessary to tighten the pinch bolts on the dropouts with a 5 mm Allen key.

3. Adjustment

Adjusting the Rotation of Road Handlebars – Comfortable & Aerodynamic

Bike assembling – alignment of drop bars
  • Turn it up or down so that you can comfortably reach the shift/brake levers.
  • Ideally you should be able to reach the bar grips with a straight back by only moving your pelvis.
  • lRelaxed wrists allow for optimal blood circulation.

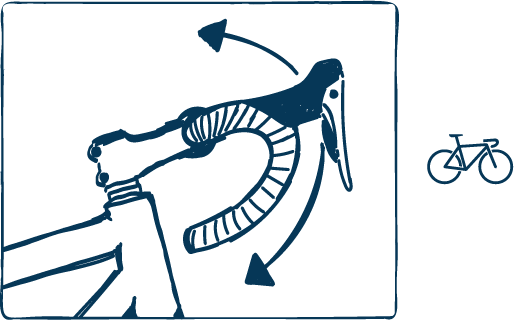
Adjusting Straight Handlebars – Control & Ergonomics

Bike assembling – alignment of straight handlebars
  • Turn it up or down so that you can comfortably grip the shifters and brake levers.
  • In the best case you can actuate all levers with your fingertips.
  • Straight wrists (forearm and fingertips form a line) allow for optimal blood circulation.

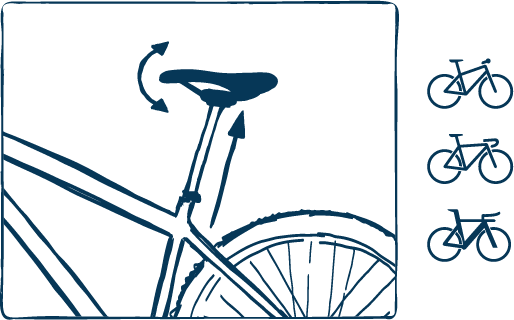
Adjusting the Saddle Height – How to Sit Correctly for the Test Ride

Bike assembling – adjusting the saddle height
  • Put on the shorts or pants and shoes you want to ride with, and get on your new bike.
  • Next, place your heels on the pedals.
  • When turning the crank to the lowest point (6 o'clock), the legs should be fully extended.
  • If this is only possible with a lateral pelvic tilting movement, the saddle must be adjusted a little lower.
  • For further tips please take a look at our ergonomics topic page


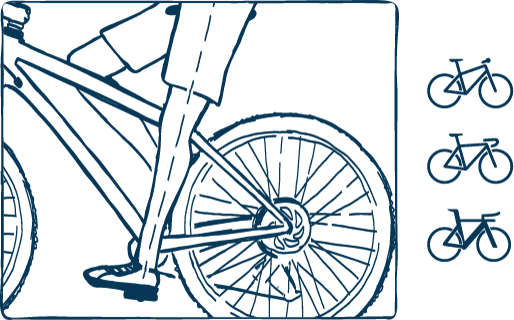
Bike Assembly Before Delivery

After submitting your online order to BIKE24, you’ll receive a bike almost ready for use. Before shipping, we take care of most stages of assembly and set-up like adjusting of the derailleur, lubrication and ajusting of the headset and checking the correct tightening of the bolts. This way, you receive a bike that’s practically already fully assembled. In the following, we took a closer look at our mechanics during bicycle assembly and adjustment.

BIKE24 – Bike assembly before delivery

Bike assembly encompasses the following steps, among others (the number and order of steps may vary depending on the bike model):

  • Checking and centring the wheels

  • Checking headset lubrication and adjusting play

  • Adjusting bike brakes and shortening the cables, if necessary

  • Configuring bike gears (switchgear and the derailleur of the gear shift, if necessary

  • Adjusting the suspension (configured as standard for a rider’s weight of 85 kg)

  • Checking all screw connections for correct tightening (torque) and the right fit for all components

  • Testing any lights

  • For road bikes: Wrapping the handlebar tape around the drop bar

  • Checking electronic gears for firmware updates

  • Installing the bike seat onto the seat post and adjusting it horizontally

BIKE24 – Bike assembly before delivery

Finally, we record the frame number and carry out at least two independent test rides.

We then ship the bike to you. The remaining steps are easy to perform, meaning you can quickly fully assemble your bike without any previous experience – no matter whether it’s a road bike, mountain bike or another kind of bike.

Electric Bike Assembly/First Charging of the E-Bike Battery

We also take care of complete assembly and careful inspection for e-bike orders. This includes checking all the system functions as well as the support levels of the motor, the pushing aid, lighting, as well as the display and control buttons, for instance. What’s more, we carry out any necessary system updates.

It’s important to correctly charge e-bike batteries to achieve long durability. That is why Bike24 ensures sustainable charge management for stored e-bikes. We regularly recharge the batteries according to the manufacturer’s instructions, safeguarding the maximum possible product life. Once you have placed your order, your e-bike is charged so that it’s delivered with 50-percent charge. Plus, the charging device is of course supplied with the delivery.

BIKE24 – Electric Bike Assembly/First Charging of the E-Bike Battery

This Is How Your Bike Is Boxed for Shipping

To ensure that we have our large selection of bikes in many sizes ready for delivery in stock and that you can assemble them without any problems, all bikes come well-padded in one of our special and sustainable shipping boxes. Thanks to its optimised dimensions, it makes it possible to pack almost all bikes with wheels already mounted as well as saddle and seatpost. Usually, only the handlebars are dismounted from the stem and secured properly packed with a cable tie on the top tube.